


They are,
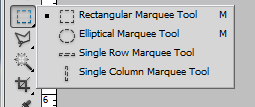
- Rectangular marquee tool
- Elliptical marquee tool
- Single raw marquee tool
- Single column marquee tool
- Lasso tool
- Polygonal lasso tool
- Magnetic lasso tool
All these tools are working in the same way.
Now let's take a deep look at this tool. Before start this lesson open Adobe Photoshop. As I told you before this tool is used to select areas. First you should open an image.
To do this, - Go to File ---> Open
- Select an image from your hard drive
Next you must take a duplicate of this image. Otherwise your original file can be changed. To do this, go to Image ---> Duplicate or right click on the title bar and select "Duplicate"
Now close the original image.

Select the Rectangular marquee tool from the tool box. Options bar will change according to the Rectangular marquee tool. Then select an area on the image (Click on the image hold and drag the mouse point to select a square). After the selection it will look like this.

You have done the selecting part. But there are few more things to learn.
How to deselect
This is a common question from the beginners. It is very simple. There are two methods.
- Go to select---> Deselect
- Press Ctrl+D
After making a selection you can move that to any place After making the selection without changing the tool dag it to the place you want.
There are some important features in options bar.
Feather value

Select the Rectangular marquee tool and look at the options bar. You will able to see the "Feather" feature. This feature is used to adjust the sharpness of the selected area's edge. To take an idea about this feature do the following exercise.
- Select an area using any selection tool.
- Set the feather value as "0".
- Select the move tool.
- Drag the selected area away from that place.


- Now undo the work you done. (To do this go to edit ---> undo or pres Ctrl+Alt+z)
- Again select an area using any selection tool.
- Set the feather value as "5".
- Select the move tool
- Drag the selected area away from the place.
Style

Let's take a look at another feature in the options tab. There is a feature called "Style" and a drop down menu. The default style is "Normal". Select the "Fixed Ratio" style. Then give values for Width and Height.
As an example enter 1 for both and try to select an area. the ratio of the width : Height will be 1:1.
Now set the style as "Fixed ratio" and give the width and height in pixels (50px for both). Then click on the image. it will automatically add a selection for the given value.

This feature contains four options.
- New selection
- Add to selection
- Subtract from selection
- Intersect with selection
The default type is "New Selection". Select an area with any marquee tool. Then select the "Add to selection" type. Now select an another area of the image (This can be inside of the previous selected area but remember not to select the second one fully inside the first one.). After that you can see the second selection is added to the first selection.
Then set the type as Subtract from selection. This type is used to subtract a selection from a previous selection.
Intersect with selection type is use to get the overlap of two selections.
|
|
|---|
|
Respected Readers:
|

|
|
|---|


0 comments:
Post a Comment
Have a doubt?? Feel free to ask...