While I was thinking about what to present you guys today, a simple but a useful animation came up in my mind. It' s the loading animation that we are all familiar with. All most all the time we see that as an indication of progress in softwares, programmes, webpages, blogs we deal with everyday. The use of a loading icon is also numerous. Its appearance hints the viewer, just like a sign that says wait. Also, there is a standard indication or sign for this loading animation (it's a circle now) where if you can remember once it was an animated hour glass. However, typically a round shape, a circle or a ball bearing is used in making loading animation. What we are going to do today is a simple one. A loading animation using a circle. You can always be creative once you learn the photoshop skill in making it. So enough about that, let's make some loading animation!
Step 1
- Open a new document with the following dimensions. (Ctrl+N or File--> New)
- Width - 400 pixels
- Height - 400 pixels
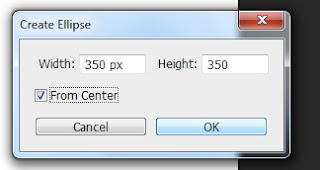
- Get "Ellipse Tool" and click on the canvas. Enter the following dimensions.
Step 2
- Now select "Single Raw Marquee Tool" and click on the canvas. It will create a selection of single pixel height.
- Take a new layer and fill it with a color
- Press Alt+delete to fill the foreground color
- Press Ctrl+delete to fill the background color
- Take another 6 duplicates of this layer.
- To take a duplicate right click on the layer and select 'Duplicate Layer'.
- Select on of line layers and go to Edit--> Transform--> Rotate.
- Enter 30.00 degrees in the Options Bar.
- Select another layer and Rotate it 60.00 degrees just like the previous one.
- Rotate other layers as following
- 90.00 degrees
- -30.00 degrees
- -60.00 degrees
- 0.00 degrees
- Again select all the layers with the background layer and align to the center.
Step 4
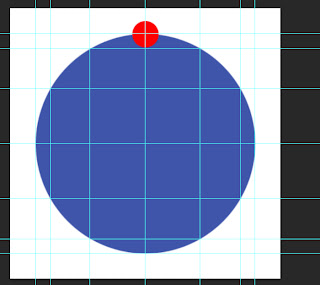
- Now zoom the image and get the points where the lines and the circumference of the circle cross and get horizontal and vertical guidelines of top of each point like this.
*To get the guidelines,
- Horizontal guidelines - Click on the horizontal ruler and drag and drop on the point.
- Vertical guidelines - Click on the vertical ruler and drag and drop on the point.
* If you can't see the ruler go to View--> Ruler.
- Delete all the line layers.
Step 5
- Select Elliptical Marquee tool
- Change the style to Fixed Size from the Options Menu.
- Set the width and height to 38.7 pixels
- Click on the canvas. It will create a selection of a circle. This is the largest circle.
- Fill it with a color.
- Place it on a point we selected before.
- Zoom and make sure you have placed the circle right on the top of the point.
- Now draw another 11 circles for the following dimensions and fill colors to them. keep in mind to make a new layer for each circle. So we can move each layer separately.
- 36.0 pixels
- 33.3 pixels
- 30.6 pixels
- 27.9 pixels
- 25.2 pixels
- 22.5 pixels
- 19.8 pixels
- 17.1 pixels
- 14.4 pixels
- 11.7 pixels
- 09.0 pixels
- Place them on the points around the circle as shown below.
- Zoom in as much as you can and make sure they are right on the top of the point.
- Take Type Tool and type "Loading". Place it in the middle of the circle.
- Delete the blue circle.
Step 6
- Select all the 12 layers containing red circles and Group them (Ctrl+G). Name it as "Group 1"
- Make another 11 duplicate groups.
- Switch off layer visibility of all the duplicate groups just created.
- This one will be the first frame.
- Switch off that group and switch on the visibility of another group. Name it as "Group 2"
- Go to Edit--> Transform--> Rotate.
- Make sure the center point is right at the center of the circle.
Enter 30.00 degrees as the angle in the option bar.
- Now switch off the visibility of that layer and switch on another. Name it as "Group 3".
- Rotate it from 60.00 degrees.
- Rotate rest of each group of circles from the following angles.
- 90.00 degrees - Group 4
- 120.00 degrees - Group 5
- 150.00 degrees - Group 6
- 180.00 degrees - Group 7
- 210.00 degrees - Group 8
- 240.00 degrees - Group 9
- 270.00 degrees - Group 10
- 300.00 degrees - Group 11
- 330.00 degrees - Group 12
Step 7
- Switch off all layers except text layer.
- CS 5 or previous versions uses go to Window--> Animation.
- CS6 users go to Window--> Timeline and select Create Frame Animation.
- CS6 users go to Window--> Timeline and select Create Frame Animation.
- Click the down arrow to set the time delay for the first frame and select other.
- Enter 0.07 seconds.
- Select the first frame and switch on the visibility on the visibility of "Group 1"
- Create new frame.
- Switch off the visibility of "Group 1" and switch on "Group 2".
- Take another frame. Switch off "Group 2" and switch on "Group 3"
- Take another frame. Switch off "Group 3" and switch on "Group 4"
- Take another frame. Switch off "Group 4" and switch on "Group 5"
- Take another frame. Switch off "Group 5" and switch on "Group 6"
- Take another frame. Switch off "Group 6" and switch on "Group 7"
- Take another frame. Switch off "Group 7" and switch on "Group 8"
- Take another frame. Switch off "Group 8" and switch on "Group 9"
- Take another frame. Switch off "Group 9" and switch on "Group 10"
- Take another frame. Switch off "Group 10" and switch on "Group 11"
- Take another frame. Switch off "Group 11" and switch on "Group 12"
-Make sure time delay of all the frames are 0.07 seconds.
Step 8
- Go to File--> Save for web.
Click on the image to Enlarge
- Set the details as shown above.
- Click Save.
That's all!!
Final Animation
|
|
|---|
|
Respected Readers:
|
|
|
|---|


Thanks Pal!
ReplyDeleteYou are using cs6 right? I only have cs3 here on my computer, and I can't follow some of your tutorial. But thanks for sharing this great stuff to us!
ReplyDeleteMaking 2d animation is more fun in Philippines!
All the steps can be followed with CS3. Can you tell me what the exact step? May be I can help.
Delete2nd step cant be followed just from using CS5 lol... this tuturial is based on CS6 the newer version... though you can figure things out even with the differences...
ReplyDeletelooking at this i definately see some things I like about CS6... step two... the dimensions input... reminds me of autocad... nice!
anyway thanks for tutorial... made me feel like an idiot for not realizing the simlicity... awesome job =]
In previous versions, go to select both layers and go to Layer --> Align to do the step 2.
DeleteI know this is very old, but your tutorial does not include the scaling of the circles like you show in the final.
ReplyDelete