


Hi guys! Back to lessons after a long break. Straight into the topic so. It's the reflect effect. This lesson you are going to learn today can be also used as one of the Photoshop tutorials for editing photos. Not only that but editing other images, texts or graphics where reflection plays a dominant part like text in black or dark background, Objects on water etc. is easy as breeze. Reflection is a widely used effect in many areas. You may not notice but whenever you visit a website or step outside, advertisements or commercials, banners. headlines depict reflection. Why though? The answer friends is an easy one. Reflection is often used because it shows or in other words say, magnifies the text or image. So that the viewer get a larger view and immediately registers it in their minds. Reflection can be varied accordingly. So that's basically the reflect effect. Let's see how to add it a text and an object.
Step 1
- Open a new canvas with the following dimensions. ( File--> New )- Width - 300 pixels
- Height - 150 pixels

Step 2
- Right click on the text layer and select "Duplicate Layer"- Now select the duplicate layer and go to Edit--> Transform--> Flip Vertical.
- Then place it under the other text layer.
Step 3
Now we should make the duplicate layer look like a reflection of the other text layer. To do this we should add a Layer Mask to the duplicate layer.- Select the duplicate layer and go to Layer--> Layer Mask--> Reveal All or press the Add layer mask button at the bottom of the Layers palette.


Now we have successfully added a layer mask to the reflection layer but still we can't see and different in the canvas.
- Now take the gradient tool (Shortcut key - G) and click on the gradient color box in the options bar.

- Set white as the color of the left color box and black as the color of the right color box.
- Press OK.
- Set the other options of the gradient tool as shown in the picture above.
Note : Before doing any changes to the layer mask we should make sure that we have selected the layer mask in the layers palette. See the example bellow.

- Now take the gradient tool. Click on the original text layer and drag down to the end of the duplicate layer. If you are confused with the start and end point of the gradient follow the picture below.

That's all you have to do.
If you think the reflection is too bright, decrease the opacity of the layer (Not the layer mask).
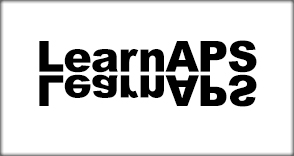
Final Image

|
|
|---|
|
Respected Readers:
|

|
|
|---|


0 comments:
Post a Comment
Have a doubt?? Feel free to ask...