


What is Motion Effect
Motion effect is often used when we want to show movement in pictures. What you have to understand here is that, motion effect does not make the picture or image move but it simply make the viewer feel or see that it is a still of a moving image. For example if you see the car below before and after the motion effect, you'd understand. Motion effect is handy when using it for a greater effect when speaking often about speed, vehicles, fastness, slow motion, super sonic etc.

Click to Enlarge
So it's time for another wonderful effect, are you ready?
Step 1
Browse to the location of the image and press OK.
Then go to the layers palette and right click on the background layer and select "duplicate layer".

You will get a new window for the duplicate you just made and you can give a name to it. Then select ok.
You'll get your duplicate layer above the original layer.

Step 2
Now we are going to add the motion effect.Select the duplicate layer then go the Filter menu, then select Blur and then select Motion Blur from it.

Then you'll get a window like this.

Then check preview on the right hand side of the window.
If you look closer, you'll see the Angle and a small cage below the picture in your Motion Bur window. From this you can change the direction of the motion effect you want to show. All you have to do is change the degree of angle you want in the box or simply you can click on the circle and drag clockwise or anti clockwise to change the angle.
Change the angle to zero.
There is another cage below all as Distance. From it, you can change the distance up to which you want. For now change it to 30 and click ok.
Step 3
Now we are going to add a layer mask. There are two ways to do it.- Select the layer which you added the motion blur (duplicate layer) and select the third icon at the bottom of the layer palette; Add Layer Mask.
- Select Layer Mask from the Layer menu and select Reveal All from it.
Next, select Brush tool from the Tool bar on your left hand side. Select black as the foreground color and white as the background color
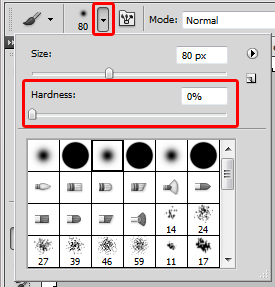
Then go to the top left corner and you'll see a menu like the one below. There click the down arrow as shown in the figure and change hardness to zero. Mind you, you can change the brush size if you want too.
Ok, now we are going to finalize our effect. You'll see a blurred image now. Place your brush on anywhere on the image and drag a little and see. Your duplicate layer which is with the layer mask is getting erased. Also if you notice, you'll see that erased part has not been a sharp one but more of a blending with the layer below. This is important because we don't want to see a sharp erosion. This is maintained like this because we made the hardness zero earlier. Go ahead yourself and see what will happen if we increase the hardness.
Now, using the brush gradually earse the unwanted parts where you don't want the motion to be seen. In my case , as I have used a car that I want to show moving to the right side, I have used the brush in a way to show that. For example I have kept the motion blur without erasing at the back of the car and erased some of it in the front. This way you can get an image with a motion effect.
Final image

I hope that you understood what we learn today. It's fun and try some images yourself.
|
|
|---|
|
Respected Readers:
|

|
|
|---|


0 comments:
Post a Comment
Have a doubt?? Feel free to ask...